1) The jailbreak app store AKA Cydia.
Those who do not jailbreak their iDevice may find themselves missing a lot of useful and fun apps. Cydia, created by Saurik, is an "underground" app store
that has little to no restrictions as to what can be available for users to download. Apps that have been rejected by Apple can usually find a home inside of
Cydia.
2) Make ringtones out of your music without iTunes
Why shouldn't you be able to make ringtones out of music you already own. With AnyRing, you can choose songs from your iPod to set as your ringtone. You can
even choose specific times in a song and save them as your ringtone.
3) Theme Customization
Apple really limits how you can change the appearance of iDevices. With Winterboard you can change your home screen, lock background, SMS background, font
replacement, sounds, keyboards and lots more.
4) Safari file download manager
This manager allows you to download media, images, documents, etc. This application is highly customizable and you can even choose where you want to save
your downloads.
5) View local files on your iPhone with a file browser
iFile is a file manager that gives you file access under root. You can move, copy, rename files as you please.
6) Toggle 3G, Bluetooth, Brightness and Wifi from one menu
Tired of navigating through the Settings Menu just so you can turn off Bluetooth, Wifi, 3G, etc. sbsettings allows you the convenience to have all those
features in one easy to access menu.
7) Transfer files to your iDevice fast and secure with SSH
Have some files that you want to take on the go with you. OpenSSH allows you to install a SSH server onto your phone. You can access those files from a PC
when you connect your iDevice to your wireless network.
8) Tether your internet connection
If you have other devices or want to share your internet connection with your friends, MyWi allows you to tether your phone's 3G connection.
9) Unrestrict your 3G Priveleges
Apple restricts iTunes downloads, FaceTime calls and Youtube HD uploads to Wireless connections. With 3G Unrestrictor, you can bypass Apple's restrictions to
these apps.
10) Five Icon Dock
Sometimes 4 icons at the bottom just isn't enough. Have instant access to 5 apps on your dock insead of 4.
Showing posts with label network. Show all posts
Showing posts with label network. Show all posts
Thursday, March 1, 2012

Monday, February 27, 2012
Create a VPN tunnel using your iPhone/iPod and your Windows 7 PC
Have you ever wanted to access network resources on your home network with your iPhone/iPod? I am going to show you how to setup a simple PPTP VPN tunnel on your Windows 7 machine and then connect to it using your iPhone or iPod.
First, we need to setup the VPN server. On your Windows 7 machine, go into your Control Panel and then open up Network and Sharing Center. Now click on Change adapter settings.

Now if your Menu is not visible like below, click Alt and your menu should appear. Click on File...New Incoming Connection...

Now you'll be given a list of users that are on your Windows 7 machine. Choose the user that you will use to login to the VPN connection. I'll be using mick for this example.

On the next page, ensure that Through the Internet is checked.

On the next page, check all the boxes as seen below.
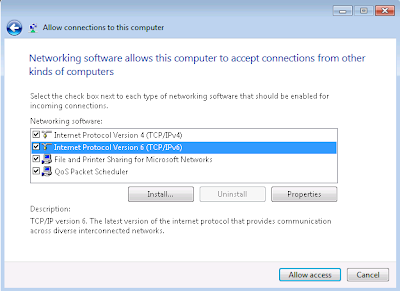
Click on Allow Access. Your Windows 7 machine should now be listening for VPN connections on port 1723. We can check that by opening up the Command Prompt and typing in netstat -a

So our VPN server is now listening for connections. We are not done yet, on your router you will need to forward port 1723 to the IP address of the machine you just set this connection up on. To get your IP address on your Windows 7 machine, open up the Command Prompt and type in ipconfig /all. Take note of the following options:
IPv4 Address...
Subnet Mask...
Default Gateway...
DNS Servers...
We are now going to set your computer up with a Static IP Address if you have not already done so.
Like before, go into the Control Panel and click on Network and Sharing Center. Then, click on Change Adapter Settings. Right click on Local Area Connection and choose Properties. Now select Internet Protocol Version 4 (TCP/IPv4) and click on Properties.
Enter in the information you took note of when using ipconfig /all.
Click Ok and open up the command prompt to make sure you can still access the internet. Type in ping google.com You should see a message that looks similar to the image below.

Now that we have a static IP address set up, we can set up Port Forwarding on the router. I am using a Linksys WRT54G router for this example.
Log into your router and find the Port Forwarding option menu. Your menu may look a little different then the one I am using but it is still the same principal. We want to forward all requests for port 1723 to the Windows 7 machine we set up the VPN connection on. Use the static IP address that you assigned your computer.

Now to connect to our VPN server, we need to know our public IP address. You can find that out by going to whatismy.com, ipchicken.com or just using google. Since your public IP Address is probably dynamic (meaning that it may change on occasion) I would suggest setting up your computer with a DynDns account. This site allows you to assign a DNS name (e.g. yourname.dyndns.org) for free and when your public IP Address changes, the software updates your DNS name with the new IP address.
Now that we have our port forwarding setup, let's set up our devices to connect to our new VPN tunnel.
iPhone/iPod Setup
Click on Settings

Click on General

Click on Network

Scroll down and click on VPN

Click on Add VPN Configuration...

Fill in the fields with your information. Ensure that PPTP is selected and Send All Traffic is off.

After you have entered all of your information, click on Save. Then try out the VPN connection, your screen should look like this if everything was setup properly.

First, we need to setup the VPN server. On your Windows 7 machine, go into your Control Panel and then open up Network and Sharing Center. Now click on Change adapter settings.

Now if your Menu is not visible like below, click Alt and your menu should appear. Click on File...New Incoming Connection...

Now you'll be given a list of users that are on your Windows 7 machine. Choose the user that you will use to login to the VPN connection. I'll be using mick for this example.

On the next page, ensure that Through the Internet is checked.

On the next page, check all the boxes as seen below.
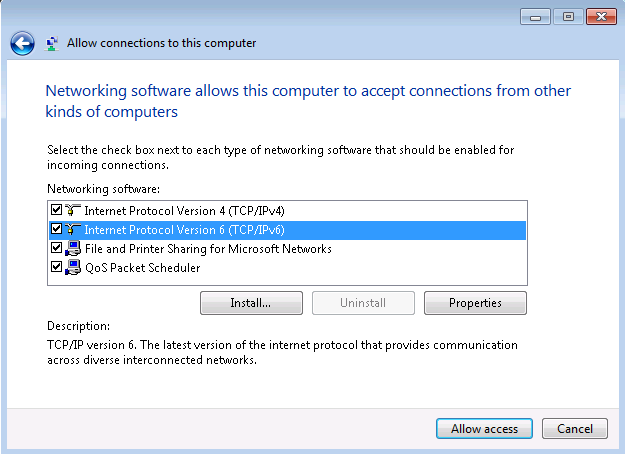
Click on Allow Access. Your Windows 7 machine should now be listening for VPN connections on port 1723. We can check that by opening up the Command Prompt and typing in netstat -a

So our VPN server is now listening for connections. We are not done yet, on your router you will need to forward port 1723 to the IP address of the machine you just set this connection up on. To get your IP address on your Windows 7 machine, open up the Command Prompt and type in ipconfig /all. Take note of the following options:
IPv4 Address...
Subnet Mask...
Default Gateway...
DNS Servers...
We are now going to set your computer up with a Static IP Address if you have not already done so.
Like before, go into the Control Panel and click on Network and Sharing Center. Then, click on Change Adapter Settings. Right click on Local Area Connection and choose Properties. Now select Internet Protocol Version 4 (TCP/IPv4) and click on Properties.
Enter in the information you took note of when using ipconfig /all.
Click Ok and open up the command prompt to make sure you can still access the internet. Type in ping google.com You should see a message that looks similar to the image below.

Now that we have a static IP address set up, we can set up Port Forwarding on the router. I am using a Linksys WRT54G router for this example.
Log into your router and find the Port Forwarding option menu. Your menu may look a little different then the one I am using but it is still the same principal. We want to forward all requests for port 1723 to the Windows 7 machine we set up the VPN connection on. Use the static IP address that you assigned your computer.

Now to connect to our VPN server, we need to know our public IP address. You can find that out by going to whatismy.com, ipchicken.com or just using google. Since your public IP Address is probably dynamic (meaning that it may change on occasion) I would suggest setting up your computer with a DynDns account. This site allows you to assign a DNS name (e.g. yourname.dyndns.org) for free and when your public IP Address changes, the software updates your DNS name with the new IP address.
Now that we have our port forwarding setup, let's set up our devices to connect to our new VPN tunnel.
iPhone/iPod Setup
Click on Settings

Click on General

Click on Network

Scroll down and click on VPN

Click on Add VPN Configuration...

Fill in the fields with your information. Ensure that PPTP is selected and Send All Traffic is off.

After you have entered all of your information, click on Save. Then try out the VPN connection, your screen should look like this if everything was setup properly.

Subscribe to:
Posts (Atom)